top of page
Creating my own 3D modelled fashion collection
For my future fashion career and my interest in digital fashion, I set as a learning goal to create the start of my Digital Fashion Library where I create and store different variation of 3D models that I create and use for my future collections, Animations and Virtual Fashion Shows.
Therefore I am using Maya as my base program to create the foundation of the show, earring, or handbag.
After fine-tuning, I am UV unwrapping the models, apply different materials for a more realistic view, and then texturing them in substance painter with my own created textures.
Leather Boots


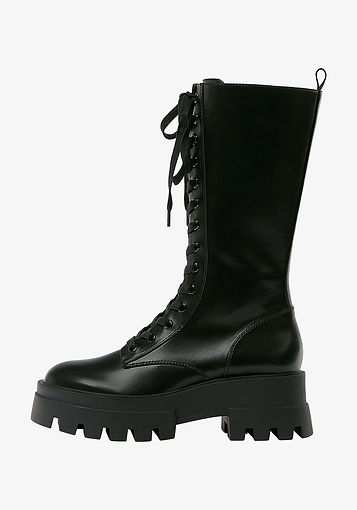
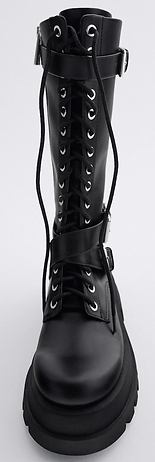
Thick, junky boots, military-style as inspiration picture.


I used this as a reference image to model on to get the main side shape and right proportions.
I started by following the lines in vertex mode and then adjusting the sizes and length of the vertex to get the first basic shape.
I extruded and shifted different parts from the shoe, so it is one whole model.
What also helped was modeling on one side and mirroring it so it would be symmetrical.
Getting the basic shapes
1:
Face> Select the exact half of the model> Delete one-half Vertex and select the vertex on the edge>Double click> R> straighten them> Click on the top in Poly modeling on Mirror and the other half will appear.
Move it as close to the other as possible and connect the vertexes with the Target Weld Tool.

2:
For easy shaping, I made sure to work with symmetry in the modeltool kit. So even though I would mirror it in the end, it will still have a smiliar shape to get an overall view of it.


3:
For an easier UV unwrapping and a correct model, having edge loop flows is really important. An edge flow means the edge or line goes around the whole object and meeting again at the same point.
When I found a triangle which means it's not working well with Maya, I added points with the multi-cut tool.
Press Q to confirm it and a line and/or vertex appears.


4:
To get the faces smooth and an even result:
Click one vertex and double click the next one to select a row
Press W and move it according to the smooth shape
NOTE: It really helps to have the side view on as well and check how deep/high the vertex has to go.
In between, it always helps to check the smoothness by pressing 3 on the keyboard and see where it needs improvement.

5:
For more structure and feel of a real boot, I extruded the Sole a little bit. Its adds depth as well as more details.
Then I applied another material, just to have it more outstanding
Face>Select>Rightclick>Assign Material> Lambert.
Also only in the end delete the faces on top because otherwise, it is not going to be mirrored smoothly.
6:
Making the holes and shoe tongue for the laces:
Select faces that you want to duplicate for making the holes inside
> Use the
>Then drag it a bit in front. It was easier for me to also work on the half first and then duplicate it.
Adding holes for the closure


7:
Add subdivisions for the holes to be able to select the faces.
Object Mode>go to attribute editor>and set a number or manually:
Object mode>Mesh tool>Insert Edge Loop
10:
I have to be careful that the faces are equally big because otherwise the holes are also different softened.
Then jo to Object Mode> Mirror to get the other half and place it back on the main shoe and Mesh>Combine to make it a whole object.

9:
Right mouse button>Edge>Select with double click the edge of the square and go to soften edge
8:
Select every second face and press shift and delete them
Adding laces
10:
I have to be careful that the faces are equally big because otherwise the holes are also different softened.
Then jo to Object Mode> Mirror to get the other half and place it back on the main shoe and Mesh>Combine to make it a whole object.
Then arrange each duplicated lace in the holes use W and E and R (on the smaller parts around the ankle.


I tried a lot of different options for the laces first with a drawn curve which I tried to extrude but it was not working since the holes are quite close to each other as well as the amount of them to keep it organized.
So I decided to go for an easier option which looks way more professional.
I did it with bend curve and then tried different angles but it was just too hard to put every single vertex through the hole itself.
SOLUTION:
I created a Poly Torus.
Face select half and delete on key board> Select edged pull it out > Mirror to get the other half and connect them with vertexes or >Merge
Outcome in Maya

Texturing

As I explained in Chapter 8: Substance Painter. I created my own types of leather for this boot as a finish. I tried several options


VARIATIONS FOR MY LIBRARY


Earrings
As an addition of my fashion accessories library, I want to create earring in different shapes unsin different tools and different textures that I can use on an avatar to show.
Doing the waste models for the factory I discovered the bend tool, which I wanted to use for this item.
1.
Cube>R>stretch>object mode> add subdivisions ca 20
use the bend handle place it right> use regulator in the attribute editor
>Keep high bound straight since that's where it goes into the ear and it needs to be straight
For straight look, keep sharp edges
For round look:
Select all edges and go to Mesh Tools> Soften edge
TEXTURES AND VARIATIONS FOR THE LIBRARY


UPLOAD AS AN OBJ TO CLO 3D

To be able to use it in a fashion-related context where I mostly work in CLO, I exported the textures as well as the model as an obj and imported it in CLO.
The advantage uploading it as OBJ instead of FBX is that you can scale it so it is possible to perfectly fit in on the avatar,
HOW TO UPLOAD A OBJ IN CLO:
Open a normal project and add an avatar of your choice
File>IMport (Add) OBJ
go to the gizmo tool and scale it up to the size where it fits the avatar
GET THE TEXTURES IN CLO:
Go to the Property Editor and select the substance exported materials in the four little squares.


SET UP THE RENDER IN CLO:
For a very high resolution render in CLO I experimented and decided for these settings:
It is very handy so save these settings for later renders with the same style and perspective.
When everything is set press the stop render button on top and then on play and wait until the render is done.
For these earrings which is a very light file, it takes about 5 mins.

RENDER


Maya allowed broadening my horizon in 3D creations.
What
I learned working in Maya: How to create complex 3D models by using different tools to form, shape, and create models from scratch.
I learned, how to do UV unwrap to be able to texture the models in Maya by uploading a texture to existing materials that I applied before to a specific area of the model. I know how to, make easy animations in Maya by using keyframes, how to model with a reference image by having different views and perspectives for a realistic outcome. I am able to export and import .fbx files and obj. files in and from Maya and make it compatible with substance painter, Unity, CLO 3D, and Mudbox.
Why
3D modeling enables me to create a realistic 3D environment that I can use for my future career in a digital fashion. Digital showrooms, photo studios, creating accessories (just what I did). I am able to teleport between different platforms and gives me a lot of new opportunities to dive deeper into the digital files of fashion since my next Minor is going to be Hypercraft 3D. For me, digital fashion is the future and something so new in this industry that I want to get as skilled as possible which this experience in the VR Minor helped me a lot.
How
I learned my skills by first attending the VR Asset classes, online courses such as LinkedInLearning or youtube tutorials. I also could always ask Danielle which helped a lot also working together and sharing each other's processes.
How I approached modeling:
I started off with very geometrical shapes for the machines. Mostly cubes and extruding them, combining different lengths and easy UV unwrapping. When I felt safe in that I tried more organic stuff with sculpting, adding edge loops, moving them, and playing with the vertexes. did I design the Machines\Charater for the factory experience:
Then I discovered the reference picture modeling which made it easier for me to model complex models with different shapes and sizes within one model (Leather Boots: shallow on the ankle, bigger on the calves, hell straight but shoe cap round)
Future perspective: Since I am doing Hypercraft in the coming semester I hope to integrate and continuing in this field as much as possible. Also developing my fashion library further is definitely another goal I set for myself.
CONCLUSION
bottom of page