SUBSTANCE PAINTER
SUBSTANCE PAINTER
Basics
I am starting to use substance painter to upgrade my models in texturing. Creating realistic textures is one of my learning goals so I following several tutorials and noting down my steps here for reference as well as development purposes.
I got started with this series to get to know the basics and trying it on my own models

On the left side, there is the 3D window and on the left side, the UVs unwrapped, from Maya.
It depends, how many different materials I apply to the object in Maya, which I can texture differently in substance painter.
It is possible to texture by throwing a given material from the shelf on the object, as well as using brushes, filters, skins, etc.
Here I will experiment and try different options to get realistic texturing.
There are several similarities for me to Photoshop such as the layer principle:
You can apply textures in different layers (on the right toolbar).
NOTE: To import a model from Maya:
UV unwrap the object and bring the pieces in the right order.
Then select the object and go to >Export selection and save it
as a .fbx.
Then go to Substance painter and import it by selecting
>New>Select>Select the file and> OK


Import in Substance

After adjusting and recolouring the Materials:
Before adding textures or smart materials on the object, it is important to us >Bake Mesh so the UVs will be prepared for any kind of materials or smart textures. See video


FOR A BETTER OVERVIEW OF THE SEPARATE SURFACES:
When texturing a more detailed and complicated model it is helpful to apply different materials in Maya and colour them just in a plain colour. So when importing it in substance painter, it is easier to apply different materials for each section. This incinerator I textured is a good example of this:


So it gets way easier when you drag the assigned material onto it.
Here you can see the sorted UV's in Maya and how the different part of the Model are being textured.

NOTE:
Here is a good example of not correct UVs. But it is no problem to fix it!! Just readjust the UV's in Maya in this case I had to stack the long rectangle together with the right one in order to make it the same size.
HOW TO APPLY TEXTURES
IN DETAIL AND CHANGE
THEIR ATTRIBUTES
I chose to try the Steel painted material and change its colour to see the effect on the model.
Therefore I just dragged it in the 3D window and the texture was applied
I played with structures, roughness, colour, shine etc.
For me finding the right track is a lot experimenting rather then just straight following a tutorial.


When there are different materials assigned in Maya for certain parts of the model, then in the 2D window only those UVs are visible. That's handy when you want to show a contrast or just other textures.
It can be defined better than using the manual brush from the toolbox.

More models as an example of my texturing technique


Machinery texture from the library with changed colour, roughness and added brush strokes to make it even dirtier and polluting looking.


Importing textures and applying them


I wanted to see how a similar object changes its appearance with the help of different materials and forms.
Since the piece of metal has almost the same foundation from Maya just completely straight, I was interested in experience the change of feel of these two objects.
I first went on https://share.substance3d.com/libraries/448 to choose this material.
When downloading keep an eye on the .sbsar file to be able to upload it as a base material later on.
When in substance painter: Shelf>import resources>addresources>selec material from decuments>click undefined> base materials or texture
Then the material is in the library and should be applicable to the model.
How a texture can add more value to a model

In some cases, materials can help a model to express more instead of model a lot of details whereas the UVs' can be mixed up again and the model looks messy due to the texture.
In this example, the rotary cutter has a wired fence next to it.
In the first picture, I modelled the wire by having a lot of enlarged cubes crossing each other which made the unwrapping and texturing very difficult and it took a lot of time for the result that didn't really convince me.
In the next attempt, I downloaded a mesh texture and replaced the wires with a plane that got a texture thrown on and it looks way more coherent and realistic.
I did this the same way I imported the metal texture as mentioned above also the quality has improved immensely as well as the file size of the model. Which also helps to implement it in unity. Check the Unity chapter for the animation of this model.

CREATING MY OWN SMART MATERIAL FOR THE MACHINES
For now, I only used existing materials and changing its colour and roughness. They all look very good in my opinion, very realistic but for people who are aware of the smart materials, know that it is just a default. Also, it would be very interesting in creating my own unique smart material that I can apply to the machines in unity later on.
I am trying to stick with the idea of a realistic rusty texture on a metal ground ( since it is mostly used for machines) as well as different colour options, its shine, brightness, etc.
1. I am taking an object and baking all its maps so it is ready for colouring.
Then I am applying a normal material in a filled layer as a base.
I go to properties and fill in colour: dark green and change its roughness to 0.24 for a more realistic outcome


2. Create a new filled layer and add a black mask
Change its base colour to black and the roughness to ca 0.5


3. Click on the second window in the filled layer and add a generator
Go to properties and add the "maske builder" generator
4. In this generator all the details ( rusty in my case) are being defined. very single detail is possible.
Sratches, dust, rust, shine, gontrast.
There is no recipe for this. I tried out as much as possible to get the look that I wanted

As an example for something that really helps the realism is the Gradient Top/Down option. You can set how dark and strong the transition to the main corpus is.

5. I added a sharpen layer (filter) to the same layer to get even more detailed structure.
This adds the richness of the detail if it is very clear to see or more brushed and faded.


When I was happy with the outcome I created a folder and put all the different layers into it and called how I want my own created smart material to be named.
Then I export this resource on my desktop and in the library so I can always drag it onto other machines or objects that should have the same texture as well as importing it into my unity scene.

To add another material layer I added a Dirt generator.


HAVING A SELECTION OF COLOURS


CREATING MORE INDIVIDUAL
MATERIALS


Here I wanted to try a more glossy finish and a little bit more luxurious dirty (I hope you know what I mean) something more sophisticated but still dirty and carved at the same time.
What helped with this was to put the sharpen effect not that high as before as well as adding shine layers with this.


CREATING MATERIALS FOR MY FASHION ITEMS
LEATHER BOOTS
After creating a lot of hard materials like metal and steel I want to try to create leather materials for a shoe that I am modelling in Maya that I want to use for my library for a digital fashion collection.
Here my challenge will be to let it look realistic and still stiff even though its fabric, but on the shoe it is hard. I tried a new technique: Importing texture files in substance painter.


1.
Have your files ready, unzipped.Then just drag them into the texture folder in substance painter.
2.
Import them as textures and to
the current session.

Before changing the colour in Photoshop
After

Inspiration image:


3.
Add a filled layer and drag the according to textures to their fitting space.
I change the colour of the leather in Photoshop because I needed it in black but here it is possible to change every single detail, add brushes, wrinkles etc.

This technique makes it possible to basically turn every jpg or for example a print that I can develop for a fashion item into a smart material on substance.
By gaining this skill I can work way more individual and creative.
Creating own materials for leather and the sole of the boots
lknsjsjssnsndndjdjdjsnsn


Sole texture
First I selected the Base and determined its colour.
More and more I added fill layers and painted layers and added different components which I found in tutorials and just trying out.
For example HSL node allows you to adjust the Hue, Saturation and Lightness of an input Color.It is a basic, easy to use node that is very useful when working with Color data.
Cells 1 for example generates a Worley Voronoi-type noise, with simple Euclidean distance metric, or simply put: soft, round cells spread in a random manner. So I added it to the "Bumps"
I also used a Grunge map for the Scratches.
It allows you to alter the look of your material, mainly by adding some dust and cracks on it.


Bring substance textures into Unity
Create a new Unity project and first install my VR glasses as described above.
Then >Import New Asset (Model)
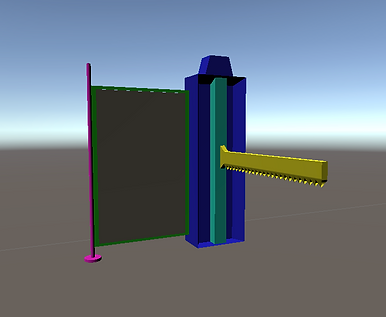
The FBX will have a little arrow on its picture that's normal since I assigned all the parts with separate materials. That's why the cutter looks like a clown here:

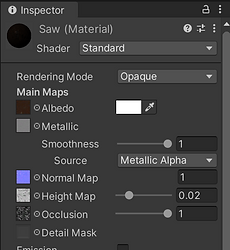
Then create a new Material in the Asset window and name it like the part you want to assign this material to. For example, the saw in my case.
Then import the texture files. In the Inspector apply the normal map.
Go to your material and in the inspector drag each texture file in its right spot.
In the 3D window, the change is immediately visible.

It's good to keep the files organized so I could also exchange textures easily when needed. Just create new folder and pack everything that belongs together in one folder.
Bring substance textures back into Maya
USING ARNOLD
Export the textures from Substance as Arnold
Under File>Export>chose Arnold in the options
Select Face>Assign New Material to the different parts
Chose lambert> open the exported materials and devided into each category:
Base texture
Normal Map
Metallic Map
Bring substance textures into CLO 6.01
A little icon pops up where oyu can scale the item to the according size
The Substance integration allows users to easily import Substance SBSAR files and access Substance powerful’s capabilities directly in the CLO software, showing textures and materials more realistically than ever before through physical based rendering technology. These material properties can be customized and edited by the designer directly in the property editor, taking true-to-life virtual simulation in 3D apparel design to the next level.


Save file as .obj or .fbx and import it inCLO:
File>Import(Add)
Fit on the Avatar
Import as a trim and glue it to the avatar


Export the textures from Substance & importin them in CLO:
Similar to importing textures to a maya model.
Drag the specidfic maps in the right place and remember to place each materials as textured in substance.
in my example the sole has two different parts
Different render settings, same model just different fabric settings and lightening

